Overview
Job change alerts on Predictiv help ensure you’re always on high alert for key career moves within your Ideal Customer Profiles (ICPs). Imagine knowing every time an ICP changes roles or gets promoted — this insight makes conversations easier and more meaningful.
Wouldn’t it be great to track multiple ICPs at once? Considering the number of potential contacts fitting your ICP (possibly tens or hundreds depending on the geo, title, industry, etc.), it’s essential to have an efficient system in place. Predictiv’s bulk job change alert feature ensures you stay on top of these shifts, helping you maintain connections with potential buyer committee members, not just decision-makers. After all, ABM and sales are long-term games where consistent brand presence matters.
This guide walks you through setting up both individual and bulk job change alerts in Predictiv.
Setting Up an Individual Job Change Alert
Step 1: Log into Predictiv
Step 2: Navigate to the “Prospect” page

Step 3: Add your required filters

Pro Tip: Choose leads/contacts who currently influence buyer decisions.
Step 4: Click “Search”

Step 5: Select a contact for which you’d like to create a job change alert.

Step 6: Click on the contact’s name to open a window with the contact’s expanded details.

Step 7: Click the “Get Alerts” button next to the contact name to enable job change alerts for that particular contact.

Setting Up Bulk Job Change Alerts
1 Create a Short List
Step 1: Log into Predictiv
Step 2: Navigate to the “Prospect” tab

Step 3: Click on the “List” tab under “Prospect”

Step 4: Click the “New” button in the top-right corner

Predictiv offers 3 list options, to know how to create them, click on the respective lists linked below.
- Short List – Primarily used for job change alerts or bulk exports.
- Account List – A company-focused list, especially useful for ABM targeting.
- Suppression List – Used to exclude contacts/companies from your targeting efforts.
Step 5: Select “Short List” (This type of list is for job change alerts and bulk exports.)

Step 7: Choose “Contact List” as the list type.

Step 8: Name your list and click “Create”

Pro Tip: Name your list based on the personas or job titles you’re targeting.
Once your list is created, it’s time to fill it with contacts.
Add Contacts to Your Short List
Step 1: Go to the “Prospect” page

Step 2: Apply filters to refine your contact search. Click the “+” icon on the left sidebar to expand and customize your filters.

Step 3: Use the filters on which you’d like to base your search.
Pro Tip: The Contact filter has check boxes for “Has a phone” and “Has an email” to ensure you’re working with qualified leads.

Step 4: [Optional] Set up a persona to make your search more targeted. To know how to create a Persona, click here
Step 5: Click “Search”

Step 6 [Optional]: Select contacts using the checkboxes on the left of each contact. (You can also exclude the contacts you’ve already exported to ensure there are no duplicates)

Step 7: Once you have selected your contacts, click “Add to List” in the top-right corner.


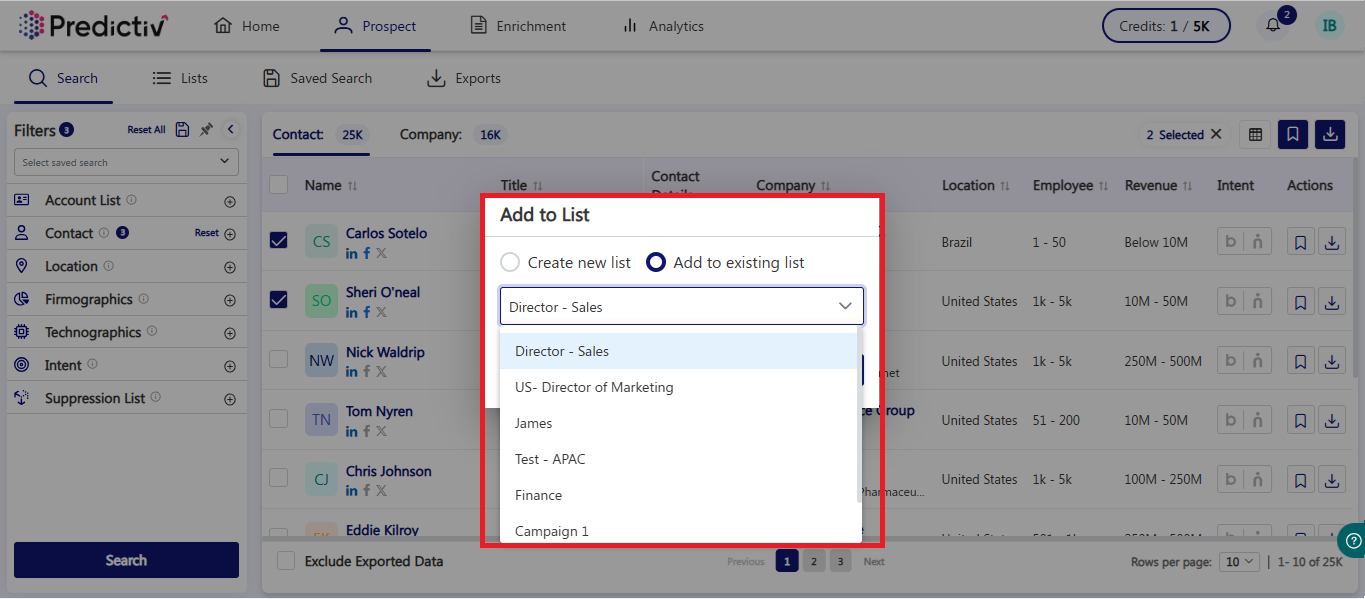
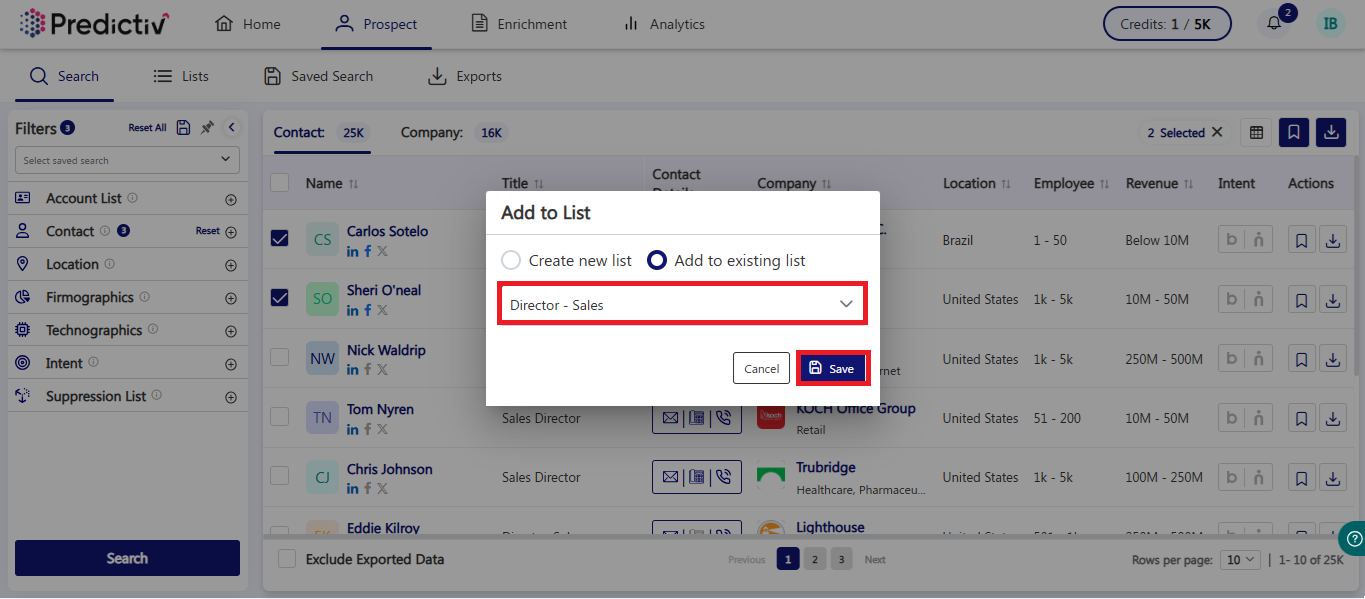
Step 8: Choose “Add to an existing list” and select the list you just created from the dropdown.

Step 9: Click “Save” to update your list with the selected contacts.


Note: You don’t have to create a list before starting your contact search. You can create it on the fly during the process.
Activate Job Change Alerts for Your Short List
Step 1: Navigate to the “Prospect” page and go to the “Lists” section.

Step 2: Select the Short List you created for job change alerts.

Step 3: Find the “Alerts” header in your list view.

Step 4: Click “Get Alerts” to enable job change alerts for all the contacts in your list.
Need Help?
Reach out to [email protected] for any assistance with job change alerts or other Predictiv features.
